
Git introduction: Using the Git staging area
Overview
Exercises: 10 min
- Why do we recommend to first add, then commit a change?
- What should be included in a single commit?
- Demystify the Git staging area.
- Learn how to tell a story with your commit history.
git add vs git commit
We have been using git add every time we want to
commit a change, separate from git commit. Why? We will demystify this now,
and learn how to keep organized.
Commit history is telling a story about how your code came to be
- Code is rarely self-documenting.
- Code also doesn’t reveal how it came to be, only what is there now.
- It would be great if all changes were documented, but that is too much to ask.
- What is a good compromise?
Git forces you to create version history and commit messages, and if these are clear then you are a long way to organized code.
It is useful to have a nice and readable history
Bad example:
b135ec8 now feature A should work
72d78e7 feature A did not work and started work on feature B
bf39f9d more work on feature B
49dc419 wip
45831a5 removing debug prints for feature A and add new file
bddb280 more work on feature B and make feature A compile again
72e0211 another fix to make it compile
61dd3a3 forgot file and bugfix
There are multiple things that are not so stellar in this version control history.
- Very often you will be obliged to do archaeology in your code.
- Imagine that in few months you discover that feature B was a mistake.
- It is very difficult to find and revert B in this example.
Main development line should have a nice and readable history
Good example:
6f0d49f implement feature C
fee1807 implement feature B
6fe2f23 implement feature A
We want to have nice commits. But we also want to “save often” (checkpointing) - how can we have both?
- We will now learn to create nice commits using the staging area.
- Staging addresses the issue of having unrelated changes in the same commit or having one logical change spread over several commits.
- The staging area isn’t the only way to organize your history nicely, some alternatives are discussed at the end of the lesson.
An analogy
- You need to go shopping and buy some stuff for work and for home. You need two separate receipts.
- Bad idea: go through the store get home stuff, pay, start at the beginning and go through the store again. This is inefficient and annoying.
- What you actually do:
- Go through the store and put everything you need in your shopping basket.
- Get to the checkout. Put your home stuff on the conveyor belt
(
git add). Check both the belt (git diff --staged) and your basket (git diff) to make sure you got all your home stuff. - Pay (
git commit) - Repeat for work stuff.
In order to keep organized, you have to use multiple locations to stage things in sequence.
What can go wrong without staging
- You wait too long before you record a change.
- You may have done too many changes and cannot go back just the last step.
- You do several things at once (different files or same file), but commit them at the same time.
States of a file.
Just like the shopping example, files can be untracked (still on the shelf), modified (in your basket), staged (on the conveyor belt), or committed (paid for).
We have a variety of commands to go between states:
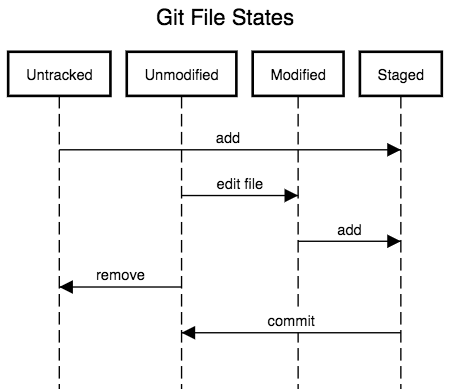
$ git add <path>       # stages all changes in file
$ git add -p <path>    # stages while letting you choose which lines to take
$ git commit           # commits the staged change
$ git diff             # see **unstaged** changes
$ git diff --staged    # see **staged** changes
$ git rm               # removes a file
$ git reset            # unstages staged changes
$ git checkout <path>  # check out the latest staged version ( or committed
                       # version if file has not been staged )
git addevery change that improves the code.git checkoutevery change that made things worse.git commitas soon as you have created a nice self-contained unit (not too large, not too small).- Discuss/think about what is too large or too small.
Example
$ git add file.py                 # checkpoint 1
$ git add file.py                 # checkpoint 2
$ git add another_file.py         # checkpoint 3
$ git add another_file.py         # checkpoint 4
$ git diff another_file.py        # diff w.r.t. checkpoint 4
$ git checkout another_file.py    # oops go back to checkpoint 4
$ git commit                      # commit everything that is staged
git diffgives differences with respect to the staging area, this is very practical.- Using
git addwe can create very nice coherent commits. - The
-poption gives you even more control, and as a bonus shows you the diffs as you stage/reset/checkout things.
Exercise: Using the staging area
- In your recipe example, make two different changes to
ingredients.txtandinstructions.txtwhich do not go together. - Use
git addto stage one of the changes. - Use
git statusto see what’s going on, and usegit diffandgit diff --stagedto see the changes. - Feel some regret and checkout the unstaged change.
- Feel further regret and unstage the staged change.
Staging everything
Sometimes you want to stage all modifications but not add any new files. No need to stage them one by one:
$ git add --update
Also removals of tracked files are then automatically staged.
(Optional, semiadvanced) Alternatives
Some people accept that there will be many small commits. Some people
are very obsessive about clean history and constantly use rebase to
make it clean.
Below are some alternatives, from easiest to hardest. Don’t worry about understanding them all, this is one of the last lessons so we just try to show you some dreams
Use git commit -p.
You can use git commit -p on unstaged changes to directly commit.
This is a convenient short cut, but if you notice something wrong as
you are committing, you have to start over again. Still, if you are
doing simple things, it can be useful. Check git show HEAD and git
diff when done to make sure things are OK.
You could use lots of temporary branches. It’s more explicit but can get annoying. Then, you can use rebase to squash all of the commits together.
You can make lots of small commits on a branch and then rebase them to squash them together into one commit. We don’t go into the details of rebasing because there is more that can go wrong. This is fairly advanced, but GitHub and other sites allow you to automatically do this.
Note: the “staging area” has also alternatively been referred to as the index and the cache.
Homework
- Prepare one nice commit to the guacamole recipe by staging several small changes.
- When doing this experiment with
git diffandgit checkout <path>to get a feel for checkpointing. - Observe how
git diffandgit checkout <path>are with respect to staged changes. - If you see a change with
git diff, try alsogit difftool.
Questions
- When is it better to “save” a change as commit, when is it better to “save” it with
git add? - Is it a problem to commit many small changes?
- What types of problems can occur in other version control systems without a staging area?
Key points
The staging area helps us to create well-defined commits.